Labels

Technology News (20) Tips "N" Tricks (15) Fun Stuff (3) Blogger Tip (2) Tips N Tricks (2) Android (1) AntiVirus (1) Facebook Tips (1) Resumes (1) cvmaker (1)

Bookmark, Share Or Print This Page

Bookmark, Share or Print this page:

Search This Blog

Showing posts with label Tips "N" Tricks. Show all posts

Friday, January 27, 2012

Increase Your SD Card Read Speeds By 100-200% With A Simple Tweak [Hands-On, Benchmarks]

Poor SD Card performance can definitely have a negative effect on overall experience with your device, especially when considering apps that rely on speedy SD Card access, like the Gallery, or features, like Apps2SD.
XDA forum member brainmaster has been hard at work on tweaking some settings in Android to improve the situation in this very department. By adjusting a certain SD card cache value, he, along with many others on xda who tried this out, were able to significantly improve read speeds, usually at least doubling or tripling them, and in certain cases going even higher.
I thought it was a pretty interesting concept, so I decided to give it a run on my OG Moto Droid and outline my results here. It is worth noting that this process only focuses on the read speed of the SD Card and has no effect whatsoever on the write speed.

You must have root access with write permissions to /sys in order to modify any of the following values.
The basic idea behind this fix is to modify the amount of available read-ahead cache for reading SD Card data. By default, most ROMs will have anywhere from 4KB (for example, on the EVO 4G running Fresh) up to 128KB set aside for this task. In order to find the cache size on your device, fire up Root Explorer and navigate to:
/sys/devices/virtual/bdi/179:0/read_ahead_kb
If you plan on running this test yourself, you can simply modify the value in this file, save, and test away. However, know that upon reboot, it will return to default unless you make it permanent (more on that later).
I am currently running Project Elite 4.2 (Froyo base), which provides 128KB of cache by default. For the initial test, I did not make any modification to the cache value. I ran the test three times at the stock value and each of the modified values to ensure proper readings.
To run these tests, I am using an app called SD Tools which you can grab for free in the Android Market.

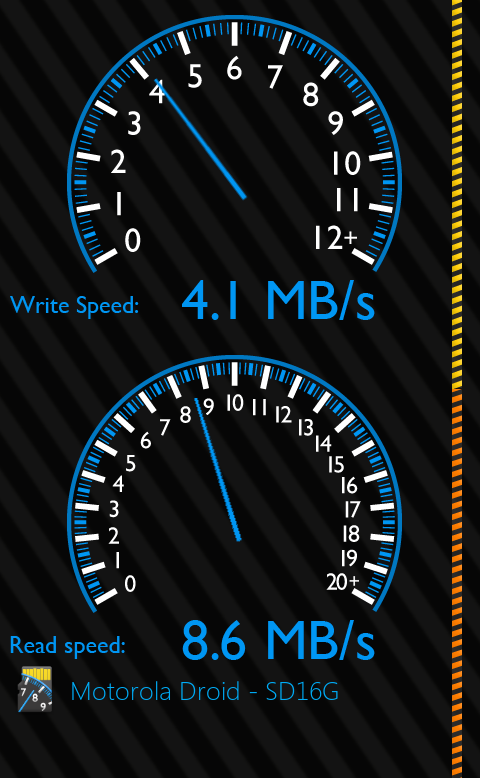
First Run: 128KB

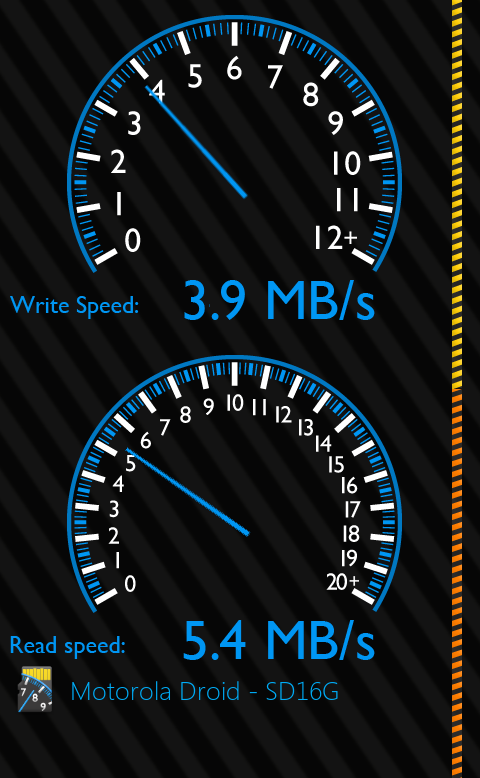
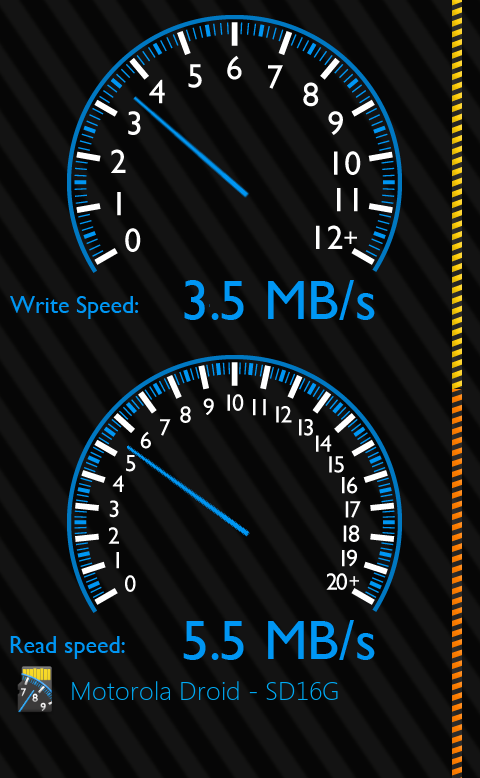
128KB-1 128KB-2 128KB-3
As you can see, my card is quite slow, with the highest read speed at a mere 5.5 MB/s. The lowest was 5.4 MB/s, making the average speed 5.43 MB/s.
For the next run, I have modified the value to 1024KB and will increase by 1024KB for each subsequent test.

Second Run: 1024KB

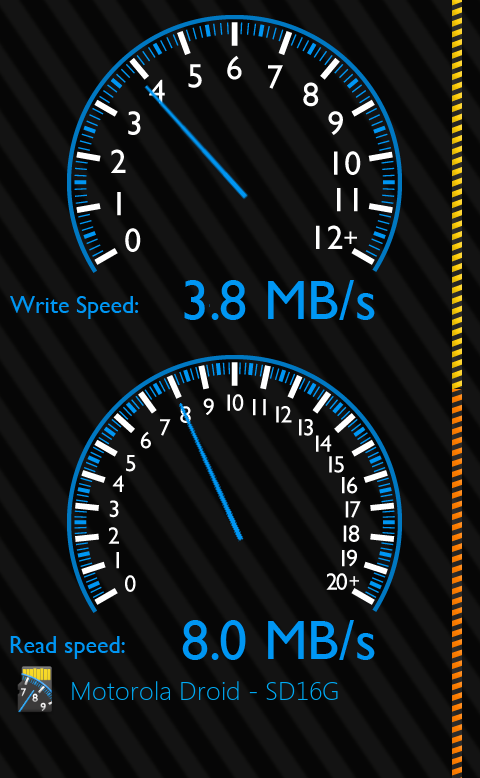
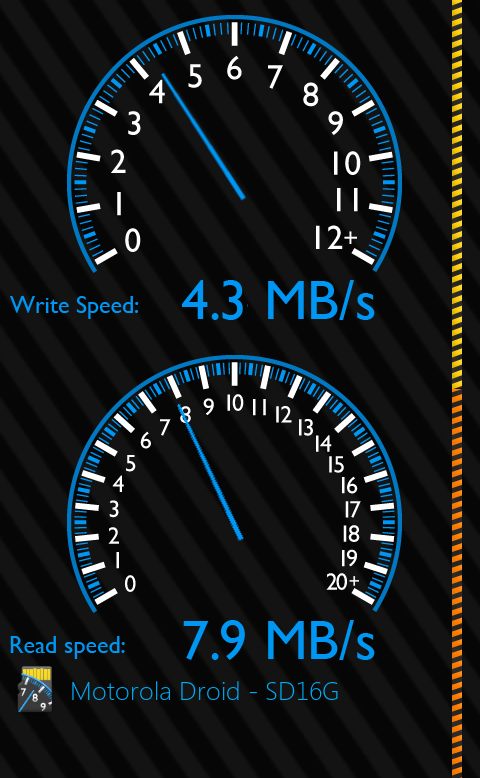
1024KB-1 1024KB-2 1024KB-3
The average speed for this run comes out to 7.8 MB/s which is an average speed increase of +2.37 MB/s. That's nothing to brag about, but I'll take any speed boost that I can get.

Third Run: 2048KB

2048KB-1 2048KB-2 2048KB-3
According to the XDA thread, this is the setting in which most users achieved the best performance. My results were more sporadic than the previous tests, but the average speed for this run was 7.867 MB/s, giving a very slight +0.067 MB/s advantage over the 1024KB cache size.

Fourth Run: 3072KB

3072KB-1 3072KB-2 3072KB-3
Again, my results lacked consistency. Even though the second test provided the fastest speed I've seen yet, the average speed of this run was only 7.83 MB/s, which is -0.0369 MB/s over the previous run.

Fifth Run (Final): 4096KB

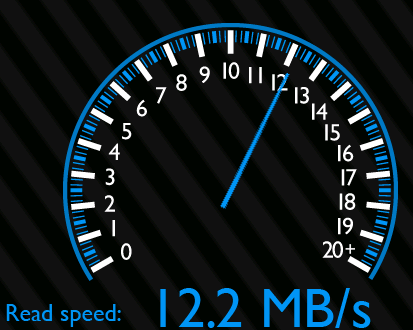
4096KB-1 4096KB-2 4096KB-3
This run produced the best results, but still not a whole lot different than the previous numbers. The average speed this go was 8.167 MB/s, which translates to +0.337 MB/s over the previous run and +0.3 MB/s over 2048KB cache, which was the fastest run prior to this one.

Conclusion

After applying the SD card cache fix, I saw a decent increase in read speed from about 5.4MB/s to 8.2MB/s. I urge everyone to give these tests a run for themselves - you may be very pleasantly surprised, especially if you original cache value was 4KB.
Once you find the value that works best for you, can you make it permanent by flashing the appropriate file found in the source thread through ClockworkMod Recovery (there are also instructions for setting the values with RA recovery or manually for those who do not want to flash or don't have CWM/RA).
If you decide to give this a go, let us know what value worked best for you along with your phone model in the comments.
Source: XDA

[Tutorial] How To Change The Bootscreen On Your Android Phone And Make Waiting For It To Turn On Suck Less

 
Let's face it: as Android users, we like options. One of the greatest things about this platform is the insane level of customization possible, especially if you don't mind getting your hands a little dirty. With some readily available tools (all of which are extremely free) and the proper knowledge, you can make your android phone do almost anything you could possibly want and make it look however you want. What we'll be talking about today is the bootscreen.
The bootscreen is that animation that plays during your phone's (admittedly long) power-on sequence. It's really easy to switch it out and, provided you've found one you like, I can show you how to change it. After some deliberation, I've decided the best place to start is the beginning.
There are some tools you'll need to have installed before we can start. First off, except in some special cases where the /system/ directory has write access already, you'll need root access. Chances are you can find out all about that by heading over to XDA-Developers and searching for your device in the forums. Once you've done that, you'll need one of two things:
  • A file explorer on the phone that supports root functions. Some popular ones are Root Explorer, SU File Manager, and ES File Explorer.
  • The Android SDK installed on your computer. To install the SDK, follow these instructions:
    1. Download and install the Android SDK. This should also install the USB drivers you'll need.
    2. If it doesn't install the drivers, then follow these steps.
    3. Plug your phone into your computer.
    4. Go to the settings menu. Navigate to Applications>Development>USB Debugging and check that box.
    5. Using the command prompt on your computer, navigate to the "Platform-tools" folder of the SDK.
    6. Type in "adb devices" (without the quotes) and hit the enter key. If your phone shows up (usually a crazy string of letters and numbers), then you're good to go.
Now let's say you have found a bootscreen that you really like and that matches your phones resolution (that's important). Sometimes they'll package it as a handy flashable .ZIP file that you can simply apply in recovery mode. Most of the time, though, you're going to download a bootanimation.zip file that will have to be installed manually.

TL;DR;

Basically, the idea is that we are going to be putting a new animation on our phone that will run instead of the stock bootscreen and, if we can't manage that, we'll replace the old one with a sucker-free one. We'll do them in order of difficulty. (Bonus points for you if you caught the reference in this section's title)

It is very important for me to note here that, for the purposes of this tutorial, everything is going to be geared toward the HTC Evo because that is the device I'm currently using. It has been brought to our attention that there are some variables across devices. The location of the file may be different on your device.
  • Most devices seem to store their animation is /system/media/
  • My HTC devices all store bootanimation.zip in /system/customize/resource/
  • Some users have reported being able to load bootscreens into /data/local/ which is significant because /data/ is always writable and does NOT REQUIRE ROOT ACCESS. This has not worked on my EVO, Hero, or my friend's Droid Incredible.
If there are any other locations that work or don't work you can let us know in the comments and we'll incorporate them (thanks to all the people who helped me out with this information).

The Root File Explorer Method

This is, by a wide margin, the simplest method and in no way requires a computer. You can download the bootscreen directly to your phone and move it where you need it all on-device.

1. Install The App

Download and install one of the above mentioned root file explorers (Root Explorer, SU File Manager, ES File Explorer) or any other of your choosing. It just has to get root access.

2. Download your boot animation.

I mean...yeah. That's the point, right?

3. Backup (OPTIONAL)

You can either copy the original bootscreen and paste it on your sdcard/computer, or you can rename it bootanimation.bak and leave it in the original directory for safe keeping.

4. Copy/move

Copy the bootanimation.zip to the directory that it belongs in.

5. Reboot. Enjoy.

Reboot. Enjoy.

The Recovery Flash Method

The flashable .zip method is as straight-forward as straight-forward can be:

1. Put the .zip file on your sdcard

2. Boot your phone into the recovery console

3. Select "Flash ZIP from sdcard"

4. Find the .zip file

5. Flash it

6. Enjoy.

The ADB Method (AKA The "Aw, Dang It" Method)

For each phone the location may be a little different, but the idea remains the same. We're going to be swapping the bootanimation.zip that came on the phone with one that doesn't suck. I'll be using a Windows computer to do this on my HTC EVO 4G.
It's pretty simple if you're comfortable with ADB. Even if you're not, though, it's simple enough for you to pick up quickly

1. The Hunt

Find your animation. There are a multitude of places to find them, but I plan on showing a lot in the future, so let's just assume you want this one.
bootanimation-win7-nexus-preview

2. The Name

Rename the .zip file to "bootanimation.zip".

3. The Location

Place this .zip file in the same directory as the SDK's "ADB.exe" file. If you have a recent version of the SDK, this will be in the "platform-tools" directory. On older versions, it will be in the "tools" directory.
sdkdirectories

4. The Commando

Here's where the magic happens: We're now going to the command line or, as I call it, the commando line. That sounds way cooler.

5. Black Ops

Now, we'll navigate to the directory with ADB in it that we talked about earlier. (My Android SDK folder is named "ASDK" for the sake of brevity.)
asdknav

6. Did You Plug It In Right?

Now we're going to run a command to make sure your phone is being recognized by your computer. Type in (without quotes) "adb devices" and hope that some crazy numbers and letter show up.
adbdevices

7. This Is Getting Real

Neat. We're ready to roll. We're now going to mount the system as read/write so we can mess with system files. My favorite method is the simple command "adb remount". Alternatively, you can type in "adb shell" and (on the EVO, as well as most other HTC devices) run the command "mount - o remount,rw -t yaffs2 /dev/block/mtdblock3 /system" then, subsequently, "exit". Well done. You are now the builder and destroyer of Android (provided it told you 'remount succeeded').

8. Back That Thang Up

We're in the home stretch now. Remember how we put the bootanimation.zip in the folder we also have ADB in? Here's why. We are going to back up the old bootanimation.zip then install our new one. The first order order of business is getting into the shell (basically using the command line in the phone using our computer as the window to see it). Type in "adb shell", hit enter, then type "su" and hit enter, just to make sure you're in superuser mode. Then we'll navigate to where the current bootscreen is on the phone. Mine is in /system/customize/resource/ so I'm going to type in "cd /system/customize/resource" then, just to make sure I'm right, I'll type in "ls" and verify the file is there. Now, let's make sure we have a backup in case we do something ridiculous and need to roll back. Type in "mv bootanimation.zip bootanimation.bak. Basically, the old one will sit there and, should we need to, we can rename it back to bootanimation.zip and it will be back to its old self. Issue the exit command until you're out of ADB shell.

9. Do The Deed!

This is it, guys. The final step. We will now issue the magic command:
"adb push bootanimation.zip /system/customize/resource/"

10. You're Done. Turn It Off And Enjoy.

The name of this step is also the entirety of the step. You did it.
While it may seem a little convoluted, this project is easy for beginners and SUPER easy for advanced users. It makes an awesome introduction to ADB and Android modding in general. I hope this helped you out and I look forward to seeing how all you crazy cats use and abuse this information to do hilarious, amazing, and entertaining things.

Friday, September 2, 2011

How to Use LinkedIn to Increase Your Hirability

LinkedIn is the social network of choice for hooking up with people and companies professionally; in fact, one survey found that 86% of companies that use social networks to recruit talent do so with LinkedIn. Just being on LinkedIn and participating in relevant groups has helped open up freelancing opportunities for me, and the service offers a great many features you may or may not know about that can help support your own networking, freelancing, or job search needs. Here's a look at how to use LinkedIn's many tools to increase your "hirability."
Below we'll explore how to:
  1. Tweak your profile to make it more enticing and search-friendly.
  2. Automatically pull in interesting data into your profile using apps (so you don't have to manually update everything.
  3. Use the power of LinkedIn groups to really boost your professional opportunities.

The LinkedIn Profile: The Homepage of Your Career

The profile page is, in essence, your way of building your "personal brand" on LinkedIn, and it's also how you get found by others—whether they're recruiters, old colleagues, or potential clients.
Note: If you're already using LinkedIn, you've already got a profile. In this section, I'll detail ways to make your profile more employer-friendly, but if yours is already polished to perfection you can just jump to the next section, "Applications: Make Your Profile a Dynamic Showcase".
LinkedIn's profile page can even serve as a one-page digital resume, since it includes all the major things you'd have on one: a profile summary, current and previous work experience, education, and personal website(s) links. You can save your profile to PDF or use theLinkedIn Resume Builder we noted last year to turn your profile into a more traditionally styled resume with little hassle.
Because I fall into the jack-of-all-trades category and my resume is somewhat long, my summary simply includes specific keywords that are relevant to the industries I've worked in (marketing, technology, and online writing) and brief details on my background. The keywords make it easier for people to find my profile in search results (if you Google me, my LinkedIn profile comes in at #6).
As with paper resumes, using keywords that show up most often for your specific industry or career could make your profile more attractive to the people who make hiring decisions.
In addition to entering relevant experience and education—which you should target for the kinds of work you want to attract—some key parts of the profile I think are definitely worth focusing on:
  • Professional headline: That's the blurb right under your name. Your title or a description of your expertise works here. Mine includes "communications specialist" simply because a lot of jobs use that phrasing/title in their listings.
  • Specialties: In the Summary section, this is where you can position yourself and where your focus is.
  • Other Sections: LinkedIn has added support for new sections such as certifications, courses, organizations, languages, and more to enhance your profile, as well as applications (more on that in a bit). The Skills section is very useful to add here; headhunters and others looking for consultants or new hires will want to see skills sets, and, again, these keywords can increase your profile visibility.
  • Contact Preferences: Don't forget in the Contact Settings to indicate how you want others to find you and if you're open to consulting offers, career opportunities, etc.

Applications: Make Your Profile a Dynamic Showcase

How to Use LinkedIn to Increase Your HirabilityLinkedIn's many plug-in applications make it easy to strut your stuff or retrieve and share information with your network. I use the Tweets application, for example, to pull in my Twitter feed; you can specify to include only tweets tagged with #in to filter out the non-professional tweets if you wish. Having your social feeds or blog posts pulled in can show prospective clients or recruiters more of your personality and help you stand out. (It goes without saying to be careful what you post on any social network.)
Other applications you can use to enhance your profile include:
  • Creative Portfolio Display: Showcases visual work, including videos, in an attractive portfolio
  • GitHub: Show off your coding projects
  • WordPress: Pull in your WordPress blog posts
  • Box.net: Share files like whitepapers or eBooks with your network
  • SlideShare: Display presentations (your own or find ones by your colleagues)

Groups: A Treasure Trove for Job Hunting

Joining LinkedIn Groups has generated the most freelance and networking opportunities for me—and I really hate networking. LinkedIn groups are a great way to connect with other professionals and even find work, for a few reasons:
  • Often, members within the topic-specific groups post openings that you might not see on job boards until later. The good thing is you already have a connection to someone associated with the company, so you have an "in" there, so to speak.
  • You'll find like-minded people who will stimulate your own work or projects. On the Creative technologists group, for example, there's a discussions on using Tumblr creatively; on LinkEds and Writers, a thread on pet peeves for commonly misused words.
  • It's easier to ask fellow group members to add you to their network by introducing yourself with the "we have this group in common" thing. Sometimes those connections lead to other connections which leads to actual work.
Just two days ago I got the nicest message in my LinkedIn mailbox from someone I was connected to through one of LinkedIn's groups. He thanked me for adding him into my network and said he might need my expertise, as he was starting a new venture. It might not work out, but the point is, just being in a group on LinkedIn connects you to scores of people you might not otherwise have met. And the more people you know, the greater your hiring opportunities.

Other Ways to Increase Your Chances of Getting Work Through LinkedIn

Besides checking the Jobs listings in LinkedIn for work opportunities and networking with your groups, there are a couple of strategies you can use to increase your hiring chances.
How to Use LinkedIn to Increase Your HirabilityConnect to the most connected people: There are some people on LinkedIn who are the "Connectors," as Malcolm Gladwell would peg them. Get connected to one of these people with 500+ network connections and you may be able to expand your network with one of their connections. One of my friends, who is also a connector, became a client referrer for me when someone he knew saw my profile linked to his. Again, just being on LinkedIn and connected to people is a big plus.
Follow companies: Following companies on LinkedIn will help you see who's coming and going at the company, new job postings, people to follow and more. Amazon even encourages prospective applicants to reach out to them via LinkedIn specifically.
Keep in touch with your network: Probably the most important thing about using LinkedIn is to just use it. It's easy to set up a profile and let it quickly collect dust (I know, I have). If you're actively looking or open to new opportunities, tweak your profile, see if there are new connections you can make, research some companies (look for "startups" perhaps) that may be hiring, or join a discussion in one of your groups.

Thursday, August 25, 2011

Ways To Make Your Laptop Live Longer


A common mistake is unplugging a laptop when using it, connecting it back to the AC only when the charge in the battery is running out. The thinking behind this move is to prevent overcharging. However, built-in protection against overcharging means that this move only serves to dramatically shorten the serviceable life of the batteries, as there is a finite number of charge-discharge cycles that a rechargeable battery can handle.


If you hear a loud, buzzing or whining sound emanating from your laptop, do send it for servicing at your earliest convenience. In a nutshell, waiting for the newly developed sounds to go away is just asking for trouble, as the sounds are likely emanating from either the built-in ventilation fans or failing hard disk drive.


The keyboard sees the heaviest physical wear and tear on the laptop. While designed for heavy use, it’s usually not replaceable if damaged and is a usability nightmare if not properly maintained. One way to protect against the introduction of foreign objects is to get a keyboard protector for your laptop. To reduce the wear on the keys and touchpad, Paul Mah advocates the use of a separate keyboard and mouse when at your desk.


Next


Due to how a computer file system works, performance of hard disk drives will unavoidably decrease over months or years of usage. As such, it is a good idea to perform a defragmentation of your data from time to time. The same is not true of solid-state disks (SSD), however, which work differently. Doing so will shorten their usable lifespan.


Next


The hard disk head hovers at microscopic distances from the furiously spinning disk surface. As such, it’s generally a good habit not to subject laptops with hard disk drives to excessive shock or swinging around when powered on.


Next


One way to quickly shorten the life or even kill your laptop would be to stuff it into your bag when it is still switched on. Damage to hardware is known to happen when applications or the Windows operating system itself hang during the shutdown process, leaving the laptop running in the confines of a bag. Check to make sure your laptop’s really powered off first.


Next


It’s always a good idea to let your service help desk, or someone who is tech-savvy, take a look at your laptop in order to make a preliminary diagnosis. This will allow new problems that are introduced as a result of the service call to be more easily isolated and identified should they surface after the repair.

Monday, August 22, 2011

Automatic Missed Call Reminders with Follow up SMS, Voice Call


It might happen to you that when you are in meeting you get a call, you end it at that moment but latter your forget to follow back the person who has called you. I have gone through it many times. Your mobile phone will show notification when you have a miss call but as you operate your mobile you hope that you will call the person back. If you are one such user like me who would like to set a reminder for miss call alerts then you should try out call reminder applications on your Android mobile phone. Out of all the reminder apps that we have for Android Pakoomba is the one I would suggest you to use. With easy to use interface and various options, it’s the app that you must have a try.
Pakoomba is a call reminder Android application available for free download on Android mobile. It serves the purpose of setting reminders on your phone automatically or manually.
While adding a reminder you are provided with the option who, when, where and notes. The reminder settings are so easy configurable and the overall interface of the application is very nice. In the preferences you can customize the call reminders, reminder time and the default handling of the miss calls. As a reminder type you can select which ringtone you wish to use, you want vibration with reminder and the maximum number of reminders. The reminder can be edit if at all you want to edit it.
Pakoomba call reminder has the following advantages –
  • Automatic reminder creates automatic reminders for missed called which can be disabled.
  • You can set multiple reminders for one miss call.
  • When you have a miss call, with this app you can quickly follow-up through SMS, Voice call, eMail from the application.
  • Variables options available to set flexible time reminders from later today, tomorrow, this week or this weekend.
  • You can search from the reminders list if you many of them with a quick search reminder option.
  • Provides the option of quickly adding a custom reminder.
  • Notes can be audio and text-based.
  • Setting available for reminders to be not popped during the working hours set by you.
  • Easy to view agenda view of upcoming and future reminders.
  • You can set place from integrated Google maps at ‘where’ option.
Pakoomba Call Reminder Pakoomba Call Reminder Pakoomba Call Reminder
Pakoomba Call Reminder Download
Pakoomba Call Reminder can be downloaded by two means –
Download it from Android Apps Labs: Simple an easy to download this app is by visiting the Pakoomba Call reminder page located at Android Apps labs which has the best collection of Android apps.
Install by QR Code: Be it a default barcode scanner or download app, you can install the app by launching the barcode reader and pointing the camera towards the below QR code.
Pakoomba Call Reminder QR Code

Wednesday, August 3, 2011

5 Cheap Android Phones That Won’t Break Your Budget In 2011

Ever since i got my HTC Desire Z, I've been loving the functions with each passing day, and i wish most people can enjoy the same features on their phones. Many may consider the HTC Desire Z expensive but i don't so i decided to do this article.
With smartphones quickly gaining popularity consumers are more eager than ever to get ahold of a one of the many low-priced Android devices stepping in to fill more conservative buyer’s pockets. A common misconception is that customers have to fork over a huge chunk of change to pick up a smartphone, luckily there are now many budget phones on the market with low price tags and high review ratings. If you’ve been searching for a quality Android device that won’t break the bank, here are five of my favorite picks:

Wednesday, July 27, 2011

Install & Run Android Apps on Windows 7 Computers

The Android operating system is the world’s bestselling smartphone platform and it has achieved this feat within quick time. The main reason being the open source of Android and the availability of Android Apps which can help users to explore out of their smartphones. Currently there are over 0.2 million of Apps available for Android at Android Market online store run by Google. The better thing is that 80% of those apps are for free downloading and remaining 20% are the paid ones with nominal fee ranging from $1 to $5. The big development of Android is only because it has growing large number of developers writing applications which extends the functionality of mobile.
BlueStacks, a name unknown until now announces the launch of their technology which allow Windows 7 PC users to run Android, install Android apps and share data between the two operating system. With BlueStacks end consumers can enjoy the full Android environment, just install Android apps, test Android apps & use those apps on their Windows PC. You can also run the Windows on your Android phone providing you Dual OS in parallel with Windows and Android. You can switch instantaneously within 1 second of time and this requires no reboot. With this you can share media between the two OS and it’s packed with lot of features.
The end users can access the huge collection of free and paid Android apps from Amazon’s AppStore. The apps purchased from Amazon can be shared across multiple OC and phones too. In addition to Amazon AppStore, it also supports applications from GetJar, SlideMe, PocketGear & LivingSocial. Regardless of the application developers all the apps designed for operating in Android will work Windows too so that the users will have same feeling, interaction and use as they get through their phone.

NetworkedBlogs