We can't say we didn't see this coming. Google just announced on the Android Developer blog that the Menu button is well and truly dead, in case you hadn't gotten the memo. The post has relevant information on how to update your apps to accommodate the new changes without breaking support for devices running software older than Honeycomb (which are the overwhelming majority at the moment).
Friday, January 27, 2012
Increase Your SD Card Read Speeds By 100-200% With A Simple Tweak [Hands-On, Benchmarks]
Poor SD Card performance can definitely have a negative effect on overall experience with your device, especially when considering apps that rely on speedy SD Card access, like the Gallery, or features, like Apps2SD.
XDA forum member brainmaster has been hard at work on tweaking some settings in Android to improve the situation in this very department. By adjusting a certain SD card cache value, he, along with many others on xda who tried this out, were able to significantly improve read speeds, usually at least doubling or tripling them, and in certain cases going even higher.
I thought it was a pretty interesting concept, so I decided to give it a run on my OG Moto Droid and outline my results here. It is worth noting that this process only focuses on the read speed of the SD Card and has no effect whatsoever on the write speed.
The basic idea behind this fix is to modify the amount of available read-ahead cache for reading SD Card data. By default, most ROMs will have anywhere from 4KB (for example, on the EVO 4G running Fresh) up to 128KB set aside for this task. In order to find the cache size on your device, fire up Root Explorer and navigate to:
/sys/devices/virtual/bdi/179:0/read_ahead_kb
If you plan on running this test yourself, you can simply modify the value in this file, save, and test away. However, know that upon reboot, it will return to default unless you make it permanent (more on that later).
I am currently running Project Elite 4.2 (Froyo base), which provides 128KB of cache by default. For the initial test, I did not make any modification to the cache value. I ran the test three times at the stock value and each of the modified values to ensure proper readings.
To run these tests, I am using an app called SD Tools which you can grab for free in the Android Market.


Once you find the value that works best for you, can you make it permanent by flashing the appropriate file found in the source thread through ClockworkMod Recovery (there are also instructions for setting the values with RA recovery or manually for those who do not want to flash or don't have CWM/RA).
If you decide to give this a go, let us know what value worked best for you along with your phone model in the comments.
Source: XDA
XDA forum member brainmaster has been hard at work on tweaking some settings in Android to improve the situation in this very department. By adjusting a certain SD card cache value, he, along with many others on xda who tried this out, were able to significantly improve read speeds, usually at least doubling or tripling them, and in certain cases going even higher.
I thought it was a pretty interesting concept, so I decided to give it a run on my OG Moto Droid and outline my results here. It is worth noting that this process only focuses on the read speed of the SD Card and has no effect whatsoever on the write speed.
You must have root access with write permissions to /sys in order to modify any of the following values.
/sys/devices/virtual/bdi/179:0/read_ahead_kb
If you plan on running this test yourself, you can simply modify the value in this file, save, and test away. However, know that upon reboot, it will return to default unless you make it permanent (more on that later).
I am currently running Project Elite 4.2 (Froyo base), which provides 128KB of cache by default. For the initial test, I did not make any modification to the cache value. I ran the test three times at the stock value and each of the modified values to ensure proper readings.
To run these tests, I am using an app called SD Tools which you can grab for free in the Android Market.
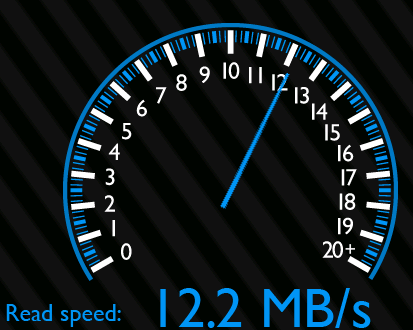
First Run: 128KB

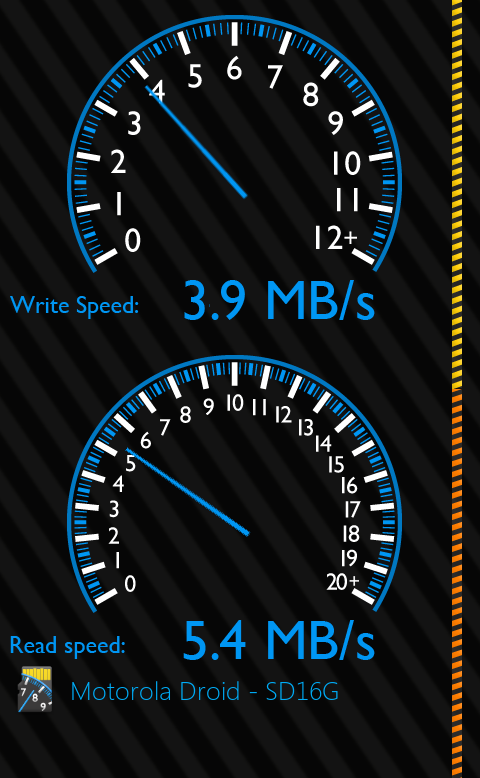
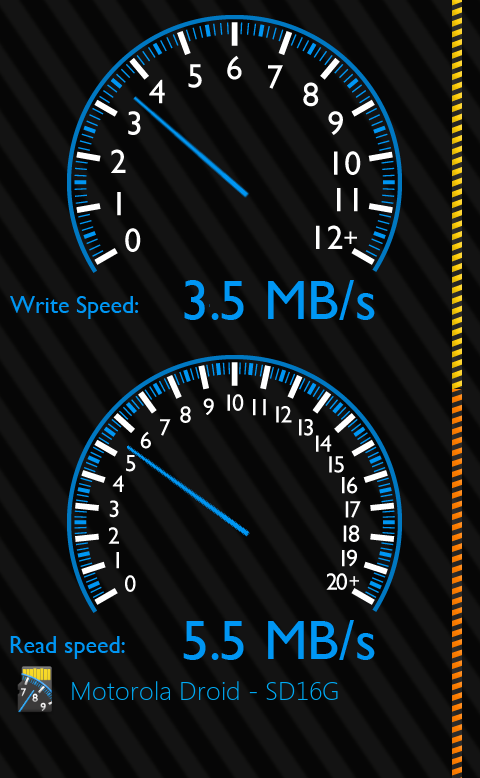
As you can see, my card is quite slow, with the highest read speed at a mere 5.5 MB/s. The lowest was 5.4 MB/s, making the average speed 5.43 MB/s.
For the next run, I have modified the value to 1024KB and will increase by 1024KB for each subsequent test.
Second Run: 1024KB


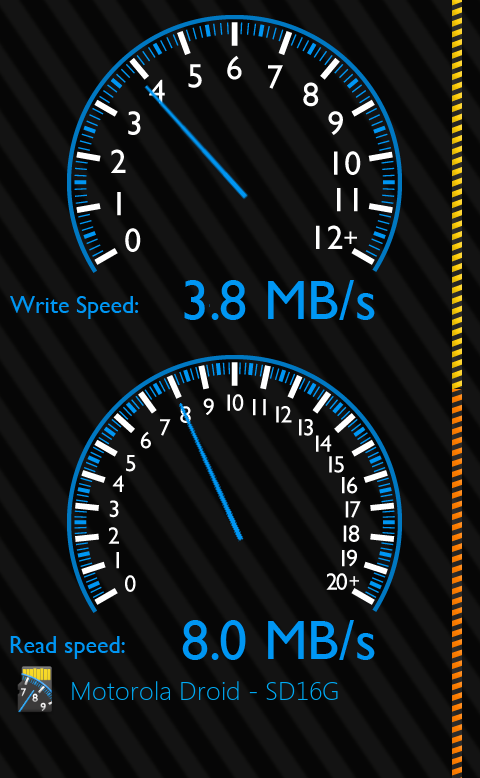
The average speed for this run comes out to 7.8 MB/s which is an average speed increase of +2.37 MB/s. That's nothing to brag about, but I'll take any speed boost that I can get.
Third Run: 2048KB

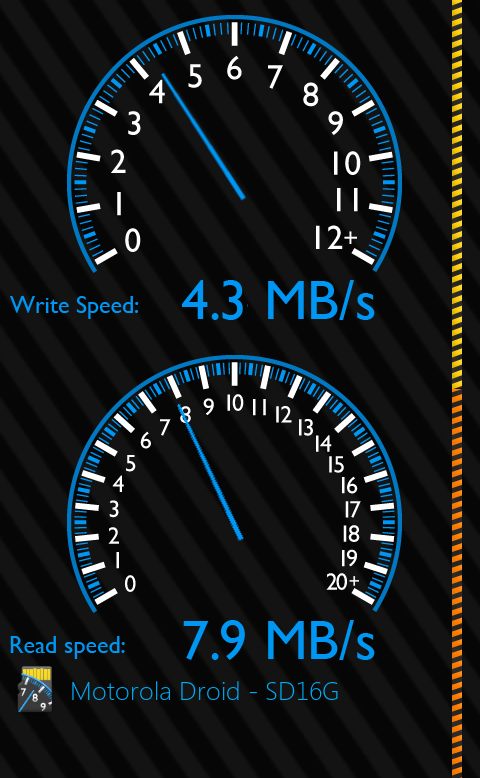

According to the XDA thread, this is the setting in which most users achieved the best performance. My results were more sporadic than the previous tests, but the average speed for this run was 7.867 MB/s, giving a very slight +0.067 MB/s advantage over the 1024KB cache size.
Fourth Run: 3072KB


Again, my results lacked consistency. Even though the second test provided the fastest speed I've seen yet, the average speed of this run was only 7.83 MB/s, which is -0.0369 MB/s over the previous run.
Fifth Run (Final): 4096KB


This run produced the best results, but still not a whole lot different than the previous numbers. The average speed this go was 8.167 MB/s, which translates to +0.337 MB/s over the previous run and +0.3 MB/s over 2048KB cache, which was the fastest run prior to this one.
Conclusion
After applying the SD card cache fix, I saw a decent increase in read speed from about 5.4MB/s to 8.2MB/s. I urge everyone to give these tests a run for themselves - you may be very pleasantly surprised, especially if you original cache value was 4KB.Once you find the value that works best for you, can you make it permanent by flashing the appropriate file found in the source thread through ClockworkMod Recovery (there are also instructions for setting the values with RA recovery or manually for those who do not want to flash or don't have CWM/RA).
If you decide to give this a go, let us know what value worked best for you along with your phone model in the comments.
Source: XDA
[Tutorial] How To Change The Bootscreen On Your Android Phone And Make Waiting For It To Turn On Suck Less
Let's face it: as Android users, we like options. One of the greatest things about this platform is the insane level of customization possible, especially if you don't mind getting your hands a little dirty. With some readily available tools (all of which are extremely free) and the proper knowledge, you can make your android phone do almost anything you could possibly want and make it look however you want. What we'll be talking about today is the bootscreen.
The bootscreen is that animation that plays during your phone's (admittedly long) power-on sequence. It's really easy to switch it out and, provided you've found one you like, I can show you how to change it. After some deliberation, I've decided the best place to start is the beginning.
There are some tools you'll need to have installed before we can start. First off, except in some special cases where the /system/ directory has write access already, you'll need root access. Chances are you can find out all about that by heading over to XDA-Developers and searching for your device in the forums. Once you've done that, you'll need one of two things:
It's pretty simple if you're comfortable with ADB. Even if you're not, though, it's simple enough for you to pick up quickly


While it may seem a little convoluted, this project is easy for beginners and SUPER easy for advanced users. It makes an awesome introduction to ADB and Android modding in general. I hope this helped you out and I look forward to seeing how all you crazy cats use and abuse this information to do hilarious, amazing, and entertaining things.
There are some tools you'll need to have installed before we can start. First off, except in some special cases where the /system/ directory has write access already, you'll need root access. Chances are you can find out all about that by heading over to XDA-Developers and searching for your device in the forums. Once you've done that, you'll need one of two things:
- A file explorer on the phone that supports root functions. Some popular ones are Root Explorer, SU File Manager, and ES File Explorer.
- The Android SDK installed on your computer. To install the SDK, follow these instructions:
- Download and install the Android SDK. This should also install the USB drivers you'll need.
- If it doesn't install the drivers, then follow these steps.
- Plug your phone into your computer.
- Go to the settings menu. Navigate to Applications>Development>USB Debugging and check that box.
- Using the command prompt on your computer, navigate to the "Platform-tools" folder of the SDK.
- Type in "adb devices" (without the quotes) and hit the enter key. If your phone shows up (usually a crazy string of letters and numbers), then you're good to go.
TL;DR;
Basically, the idea is that we are going to be putting a new animation on our phone that will run instead of the stock bootscreen and, if we can't manage that, we'll replace the old one with a sucker-free one. We'll do them in order of difficulty. (Bonus points for you if you caught the reference in this section's title) It is very important for me to note here that, for the purposes of this tutorial, everything is going to be geared toward the HTC Evo because that is the device I'm currently using. It has been brought to our attention that there are some variables across devices. The location of the file may be different on your device.
- Most devices seem to store their animation is /system/media/
- My HTC devices all store bootanimation.zip in /system/customize/resource/
- Some users have reported being able to load bootscreens into /data/local/ which is significant because /data/ is always writable and does NOT REQUIRE ROOT ACCESS. This has not worked on my EVO, Hero, or my friend's Droid Incredible.
The Root File Explorer Method
This is, by a wide margin, the simplest method and in no way requires a computer. You can download the bootscreen directly to your phone and move it where you need it all on-device.1. Install The App
Download and install one of the above mentioned root file explorers (Root Explorer, SU File Manager, ES File Explorer) or any other of your choosing. It just has to get root access.2. Download your boot animation.
I mean...yeah. That's the point, right?3. Backup (OPTIONAL)
You can either copy the original bootscreen and paste it on your sdcard/computer, or you can rename it bootanimation.bak and leave it in the original directory for safe keeping.4. Copy/move
Copy the bootanimation.zip to the directory that it belongs in.5. Reboot. Enjoy.
Reboot. Enjoy.The Recovery Flash Method
The flashable .zip method is as straight-forward as straight-forward can be:1. Put the .zip file on your sdcard
2. Boot your phone into the recovery console
3. Select "Flash ZIP from sdcard"
4. Find the .zip file
5. Flash it
6. Enjoy.
The ADB Method (AKA The "Aw, Dang It" Method)
For each phone the location may be a little different, but the idea remains the same. We're going to be swapping the bootanimation.zip that came on the phone with one that doesn't suck. I'll be using a Windows computer to do this on my HTC EVO 4G.It's pretty simple if you're comfortable with ADB. Even if you're not, though, it's simple enough for you to pick up quickly
1. The Hunt
Find your animation. There are a multitude of places to find them, but I plan on showing a lot in the future, so let's just assume you want this one.

2. The Name
Rename the .zip file to "bootanimation.zip".
3. The Location
Place this .zip file in the same directory as the SDK's "ADB.exe" file. If you have a recent version of the SDK, this will be in the "platform-tools" directory. On older versions, it will be in the "tools" directory.

4. The Commando
Here's where the magic happens: We're now going to the command line or, as I call it, the commando line. That sounds way cooler.
5. Black Ops
Now, we'll navigate to the directory with ADB in it that we talked about earlier. (My Android SDK folder is named "ASDK" for the sake of brevity.)

6. Did You Plug It In Right?
Now we're going to run a command to make sure your phone is being recognized by your computer. Type in (without quotes) "adb devices" and hope that some crazy numbers and letter show up.

7. This Is Getting Real
Neat. We're ready to roll. We're now going to mount the system as read/write so we can mess with system files. My favorite method is the simple command "adb remount". Alternatively, you can type in "adb shell" and (on the EVO, as well as most other HTC devices) run the command "mount - o remount,rw -t yaffs2 /dev/block/mtdblock3 /system" then, subsequently, "exit". Well done. You are now the builder and destroyer of Android (provided it told you 'remount succeeded').
8. Back That Thang Up
We're in the home stretch now. Remember how we put the bootanimation.zip in the folder we also have ADB in? Here's why. We are going to back up the old bootanimation.zip then install our new one. The first order order of business is getting into the shell (basically using the command line in the phone using our computer as the window to see it). Type in "adb shell", hit enter, then type "su" and hit enter, just to make sure you're in superuser mode. Then we'll navigate to where the current bootscreen is on the phone. Mine is in /system/customize/resource/ so I'm going to type in "cd /system/customize/resource" then, just to make sure I'm right, I'll type in "ls" and verify the file is there. Now, let's make sure we have a backup in case we do something ridiculous and need to roll back. Type in "mv bootanimation.zip bootanimation.bak. Basically, the old one will sit there and, should we need to, we can rename it back to bootanimation.zip and it will be back to its old self. Issue the exit command until you're out of ADB shell.
9. Do The Deed!
This is it, guys. The final step. We will now issue the magic command:
"adb push bootanimation.zip /system/customize/resource/"
10. You're Done. Turn It Off And Enjoy.
The name of this step is also the entirety of the step. You did it.While it may seem a little convoluted, this project is easy for beginners and SUPER easy for advanced users. It makes an awesome introduction to ADB and Android modding in general. I hope this helped you out and I look forward to seeing how all you crazy cats use and abuse this information to do hilarious, amazing, and entertaining things.
Thursday, January 5, 2012
Many Internet users want to download Youtube videos. Downloading the videos can be beneficial in several ways including the option to play the video at any time without having to access the Youtube website on the Internet. It can also save bandwidth and be used to transfer the Youtube videos to devices like cell phones, media players or gaming systems that are usually not connected to the Internet or that do not offer the speed needed to enjoy the videos.
Many Internet users want to download Youtube videos. Downloading the videos can be beneficial in several ways including the option to play the video at any time without having to access the Youtube website on the Internet. It can also save bandwidth and be used to transfer the Youtube videos to devices like cell phones, media players or gaming systems that are usually not connected to the Internet or that do not offer the speed needed to enjoy the videos.There are basically three ways of downloading Youtube videos: Using a web service, a web browser add-on or a standalone software program. All methods have their distinct advantages and disadvantages. Web services for example are usually independent of operating systems and can be used instantly without having to install software.They do usually lack the ability to download multiple Youtube videos at once.

Web browser plugins require installation. They have the advantage that they work directly on the site which is very comfortable for the user. They also usually do not provide the means to add multiple videos at once to a download queue.
Software programs that download videos from Youtube usually come with the option to add multiple video links to the queue before starting the download. They do need to be installed on the other hand and lack a solid Youtube browser sometimes.
1. Keepvid: A straightforward service. The user needs to paste the url of the Youtube video in the form provided on the website. Keepvid will then offer low quality and high quality downloads of the video. Works with other video portals like MySpace video or Dailymotion as well. Offers a bookmarklet which works more comfortably than copying pasting Youtube urls.
keepvid
2. Zamzar: A file conversion service that can not only download Youtube videos but also convert the videos into different formats. Great for users who need the video in a different format and do not want to convert them on their computer system.
Zamzar
3. KCoolOnline: Currently supports 231 video portals including Youtube. It has a basic interface. All that needs to be done is to paste a video url in the form to download the Youtube video. Users who like to download videos from many different video portals might like this as it supports a lot of them.
KCoolOnline
4. Video Downloader: Another basic web interface that allows users to download and convert videos from sites like Youtube, Dailymotion or MySpace. Nothing much to say about this service except that it offers downloads in the original flv format but also in mp4 out of the box.
Video Downloader
5. SaveVid: Offers Youtube videos in original flv or mp4 format. Displays a live list of videos that get downloaded by users on the website which can be a great source of videos as download links are displayed directly. Offers top 10 lists, archives and categories as well.
SaveVid

6. Vidgrab: Vidgrab offers a web form that can be used to paste Youtube videos into it. These videos can then be downloaded in their original format. One interesting aspect of Vidgrab is the list of popular videos that are displayed on the website. These can also be downloaded directly to the computer system.
Vidgrab
7. Vixy: Vixy is a video converter that supports Youtube videos. It does not offer the means to download Youtube videos in their original format. Videos can be converted into various formats including avi, 3gp, mov or mp4.
Vixy
8. KeepTube: Online service to download Youtube videos with preview and options to download the video in various formats including normal and high quality flv, 3gp and mp4. Offers additional ways of downloading the videos including a bookmarklet and a very ingenious way by adding keep- after the www. of the youtube url.
KeepTube
9. KissYoutube: Offers a similar service as Keeptube by allowing users to add the word kiss after the www. of the youtube url to download videos directly without having to visit the KissYoutube website manually. Comes with the usual form to download videos from Youtube as well.
10. Video Getting: Another service that combines video downloading and conversion in one interface. Users can paste Youtube videos in the form and download them in eight different formats.
Video Getting

1. Video Download Helper (Firefox): One of the most popular Firefox add-ons. It supports many different video portals including Youtube. The add-on will change its icon in the status bar whenever a website with media links is visited.
Video Download Helper
2. NetVideoHunter (Firefox):
NetVideoHunter: Will recognize Youtube videos and add them to its queue with the possibility to download the videos immediately or at a later time. Videos can also be played in the interface as well.

3. Viloader (Firefox, Internet Explorer, Opera): A plugin that installs itself in three different web browsers. It offers a download video right-click context menu option that can be used to download the videos from Youtube and other video portals.
Viloader
4. IE7Pro: IE7Pro supports Internet Explorer 8 as well despite its name. It comes with a userscript engine and a script pre-installed that can download Youtube videos. The browser plugin will display a download video link in the video description on Youtube.
IE7Pro

5. Flash Video Downloader (Firefox, Internet Explorer, Opera): Flash Video Downloader operates a web service to download videos and an add-on that can be installed in Firefox, Internet Explorer and Opera. The Opera is one of the few Youtube video download widgets that currently work with Opera 10.
6. Google Chrome Bookmarklet: Users can use a bookmarklet to download videos in the Google browser. All they need to do is to create a new bookmark in the web browser and add the following JavaScript code as the url:
A click on the bookmark on any Youtube video page will download that video in the Google Chrome web browser.
1. TubeQueue (Windows):
TubeQueue: A program for the Windows operating system that can queue, convert and download multiple Youtube videos. The program comes with its own search interface making it completely independent from the Youtube website.

Update: TubeQueue is no longer available. I have uploaded the latest version to the Ghacks servers. You can download the program from this link: TubeQueue (152)
2. Free FLV Converter (Windows):
Free FLV Converter: A software program that can search for, download and convert Youtube videos and videos from other web services. It’s biggest strength is the search that can easily handle thousands of results providing comfortable options to download multiple videos at once from Youtube.

3. Orbit Downloader (Windows) : Orbit is a very popular download manager that supports a variety of popular media sites out of the box including Youtube, MySpace or Pandora. It integrates with web browsers and comes with the Grab++ module that can be used to catch and download media files.
Orbit Downloader
4. Youtube-DL (Linux, Windows): A command line program to download videos from Youtube
Youtube-DL
5. Abby and CCLive (Linux): Abby is a frontend for CCLive that can be used to download videos from various popular video hosting websites including Youtube.
Abby and CClive
6. GetTube (Mac): An application for Apple Mac computers that can be used to download Youtube videos.
There are literally dozens of other applications, web services and browser plugins that can be used to download videos from Youtube. Please leave a comment if you think we should add another free services, plugin or software to the list.
Web browser plugins require installation. They have the advantage that they work directly on the site which is very comfortable for the user. They also usually do not provide the means to add multiple videos at once to a download queue.
Software programs that download videos from Youtube usually come with the option to add multiple video links to the queue before starting the download. They do need to be installed on the other hand and lack a solid Youtube browser sometimes.
Online services to download Youtube videos:
Web services are websites that provide the means to download videos from Youtube to a local computer system. Some offer advanced features like converting the video to another format. The list has been limited to ten free services that provide options to download Youtube videos.1. Keepvid: A straightforward service. The user needs to paste the url of the Youtube video in the form provided on the website. Keepvid will then offer low quality and high quality downloads of the video. Works with other video portals like MySpace video or Dailymotion as well. Offers a bookmarklet which works more comfortably than copying pasting Youtube urls.
keepvid
2. Zamzar: A file conversion service that can not only download Youtube videos but also convert the videos into different formats. Great for users who need the video in a different format and do not want to convert them on their computer system.
Zamzar
3. KCoolOnline: Currently supports 231 video portals including Youtube. It has a basic interface. All that needs to be done is to paste a video url in the form to download the Youtube video. Users who like to download videos from many different video portals might like this as it supports a lot of them.
KCoolOnline
4. Video Downloader: Another basic web interface that allows users to download and convert videos from sites like Youtube, Dailymotion or MySpace. Nothing much to say about this service except that it offers downloads in the original flv format but also in mp4 out of the box.
Video Downloader
5. SaveVid: Offers Youtube videos in original flv or mp4 format. Displays a live list of videos that get downloaded by users on the website which can be a great source of videos as download links are displayed directly. Offers top 10 lists, archives and categories as well.
SaveVid
6. Vidgrab: Vidgrab offers a web form that can be used to paste Youtube videos into it. These videos can then be downloaded in their original format. One interesting aspect of Vidgrab is the list of popular videos that are displayed on the website. These can also be downloaded directly to the computer system.
Vidgrab
7. Vixy: Vixy is a video converter that supports Youtube videos. It does not offer the means to download Youtube videos in their original format. Videos can be converted into various formats including avi, 3gp, mov or mp4.
Vixy
8. KeepTube: Online service to download Youtube videos with preview and options to download the video in various formats including normal and high quality flv, 3gp and mp4. Offers additional ways of downloading the videos including a bookmarklet and a very ingenious way by adding keep- after the www. of the youtube url.
KeepTube
9. KissYoutube: Offers a similar service as Keeptube by allowing users to add the word kiss after the www. of the youtube url to download videos directly without having to visit the KissYoutube website manually. Comes with the usual form to download videos from Youtube as well.
10. Video Getting: Another service that combines video downloading and conversion in one interface. Users can paste Youtube videos in the form and download them in eight different formats.
Video Getting
Web Browser Add-ons to download videos from Youtube
The following list contains ten web browser add-ons and plugins for popular web browsers such as Mozilla Firefox or Internet Explorer that allow users to directly download videos from video portals like Youtube. These add-ons have the advantage that the videos can be downloaded directly without having to visit another website to do so.1. Video Download Helper (Firefox): One of the most popular Firefox add-ons. It supports many different video portals including Youtube. The add-on will change its icon in the status bar whenever a website with media links is visited.
Video Download Helper
2. NetVideoHunter (Firefox):
NetVideoHunter: Will recognize Youtube videos and add them to its queue with the possibility to download the videos immediately or at a later time. Videos can also be played in the interface as well.
3. Viloader (Firefox, Internet Explorer, Opera): A plugin that installs itself in three different web browsers. It offers a download video right-click context menu option that can be used to download the videos from Youtube and other video portals.
Viloader
4. IE7Pro: IE7Pro supports Internet Explorer 8 as well despite its name. It comes with a userscript engine and a script pre-installed that can download Youtube videos. The browser plugin will display a download video link in the video description on Youtube.
IE7Pro
5. Flash Video Downloader (Firefox, Internet Explorer, Opera): Flash Video Downloader operates a web service to download videos and an add-on that can be installed in Firefox, Internet Explorer and Opera. The Opera is one of the few Youtube video download widgets that currently work with Opera 10.
6. Google Chrome Bookmarklet: Users can use a bookmarklet to download videos in the Google browser. All they need to do is to create a new bookmark in the web browser and add the following JavaScript code as the url:
javascript:window.location.href = 'http://youtube.com/get_video?video_id=' + swfArgs['video_id']+ "&fmt=18" + "&l=" + swfArgs['l'] + "&sk=" + swfArgs['sk'] + '&fmt_map' + swfArgs['fmt_map'] + '&t=' + swfArgs['t'];A click on the bookmark on any Youtube video page will download that video in the Google Chrome web browser.
Software Programs to download Youtube videos
The following list contains software programs for all popular operating systems that allow a user to download videos from Youtube.1. TubeQueue (Windows):
TubeQueue: A program for the Windows operating system that can queue, convert and download multiple Youtube videos. The program comes with its own search interface making it completely independent from the Youtube website.
Update: TubeQueue is no longer available. I have uploaded the latest version to the Ghacks servers. You can download the program from this link: TubeQueue (152)
2. Free FLV Converter (Windows):
Free FLV Converter: A software program that can search for, download and convert Youtube videos and videos from other web services. It’s biggest strength is the search that can easily handle thousands of results providing comfortable options to download multiple videos at once from Youtube.
3. Orbit Downloader (Windows) : Orbit is a very popular download manager that supports a variety of popular media sites out of the box including Youtube, MySpace or Pandora. It integrates with web browsers and comes with the Grab++ module that can be used to catch and download media files.
Orbit Downloader
4. Youtube-DL (Linux, Windows): A command line program to download videos from Youtube
Youtube-DL
5. Abby and CCLive (Linux): Abby is a frontend for CCLive that can be used to download videos from various popular video hosting websites including Youtube.
Abby and CClive
6. GetTube (Mac): An application for Apple Mac computers that can be used to download Youtube videos.
There are literally dozens of other applications, web services and browser plugins that can be used to download videos from Youtube. Please leave a comment if you think we should add another free services, plugin or software to the list.
Turn Torrents Into Direct HTTP Downloads With Torrific
Bittorrent offers a very popular way of downloading files from the Internet, or even a local network. The protocol is however very dependent on the seeders, that is the users or servers the complete files are distributed from. Users can speed up downloading and seeding of files with so called seedboxes, which are dedicated servers that usually have a much larger throughput than the lines of the clients.Torrific offers an interesting alternative to using seedboxes or downloading torrents directly to a local computer service. The free service can be used to create direct HTTP downloads of torrents. It basically works like this. The user adds a torrent file to the system. Torrific then uses its server to download the torrent, and make it available for download to the user of its service.
There are a few benefits of this, with the two most prominent ones the following: HTTP downloads are usually a lot faster than downloads from Bittorrent, and that’s true even with the added time that the downloads take before they are ready and available at Torrific.
The second advantage is that the user’s IP address does not appear in the P2P network at all. Torrific does all that, and it will be very interesting to see how they handle downloads of copyrighted media.
 The download progress of each torrent that is added to the service is displayed on the user’s profile page. Having said that it should be noted that user accounts are mandatory but easy to setup and without verification whatsoever.
Torrents can either be added directly by pointing the service to a torrent url, or by using a keyword search, which makes use of a custom Google search form. It usually is faster to locate the torrent directly though, especially if the user has a few favorite sites for torrent downloads.
Email notifications can be configured, which dispatch an email whenever a torrent has been downloaded completely by the torrent downloading service.
Some torrents are available instantly, which is the case if another Torrific member already requested it and if it still resides on the servers of the torrent downloading service. The developers state that files are usually stored for a limited period of time, due to storage limitations. This currently seems to be less than a week. The oldest torrents expire first to make room for new torrent requests.
Premium accounts are available, which offer benefits like no wait time for large torrent downloads. The service is currently in alpha, and offers unlimited downloads for free users. It is likely that this is going to change over time. Everything else would simply be unreasonable, considering that the service has to pay for the bandwidth used by its users and the downloads of the torrents.
Source
There are a few benefits of this, with the two most prominent ones the following: HTTP downloads are usually a lot faster than downloads from Bittorrent, and that’s true even with the added time that the downloads take before they are ready and available at Torrific.
The second advantage is that the user’s IP address does not appear in the P2P network at all. Torrific does all that, and it will be very interesting to see how they handle downloads of copyrighted media.

torrific
Torrents can either be added directly by pointing the service to a torrent url, or by using a keyword search, which makes use of a custom Google search form. It usually is faster to locate the torrent directly though, especially if the user has a few favorite sites for torrent downloads.
Email notifications can be configured, which dispatch an email whenever a torrent has been downloaded completely by the torrent downloading service.
Some torrents are available instantly, which is the case if another Torrific member already requested it and if it still resides on the servers of the torrent downloading service. The developers state that files are usually stored for a limited period of time, due to storage limitations. This currently seems to be less than a week. The oldest torrents expire first to make room for new torrent requests.
Premium accounts are available, which offer benefits like no wait time for large torrent downloads. The service is currently in alpha, and offers unlimited downloads for free users. It is likely that this is going to change over time. Everything else would simply be unreasonable, considering that the service has to pay for the bandwidth used by its users and the downloads of the torrents.
Source
Subscribe to:
Posts (Atom)